Engineered and Solid Flooring Installation Guide
![]() Download Engineered Flooring Installation Guidelines PDF
Download Engineered Flooring Installation Guidelines PDF
ATTENTION! READ BEFORE INSTALLING. FAILURE TO FOLLOW GUIDELINES WILL RESULT IN PRODUCT DAMAGE AND/OR VOID ALL WARRANTIES.
MODERN HOME CONCEPTS, INC. ALSO HONORS THE INSTALLATION GUIDELINES SET FORTH BY THE NWFA. THESE ARE INDUSTRY STANDARDS AND ARE AVAILABLE BY CALLING 1-800-422-4556.
INSPECT FLOORING MATERIALS PRIOR TO INSTALLATION
Before installation, any concerns about the milling or grading of this product must be directed to and resolved with the manufacturer. After the product is installed, the customer assumes all responsibility. Manufacturer is not liable for any costs of product or replacement if issues are not resolved prior to installation.
DISCLAIMER
Hardwood flooring is a beautiful product of nature, characterized by variations in grain and color—no two pieces are alike. Although we design samples to be the closest representation of the finished product, the finished floor may contain more or less variation in color, shading, grain, knots, and distressing that may not be evident in a sample. Older samples that have mellowed or samples that have been exposed to direct sunlight will appear darker or lighter when compared to the actual product. This is especially true in exotic species. All natural hardwood can dent and scratch. Due to the varying hardness of different wood species, some are more resistant than others. To reduce scratching and denting, follow proper care and maintenance both during installation and after.
JOB SITE CONDITIONS
Wood flooring should be one of the last jobs completed on the construction project. Do not deliver wood flooring to the jobsite or install wood flooring until the building is enclosed, and all concrete, masonry, plastering, drywall, texturing, and all finished wall coverings and painting are completed. Evaluate the jobsite for potential problems before installation.
APPROPRIATE TEMPERATURE AND HUMIDITY CONDITIONS
Appropriate temperature and humidity conditions are defined as conditions to be experienced after occupancy. An acceptable humidity range is 30% TO 50%, and an acceptable temperature range is 60° TO 85° FAHRENHEIT.
- Heating and/or air-conditioning needs to be used. If it is not possible for the heating and/or air-conditioning system to be operating before, during and after installation, a temporary heating and/or dehumidification system that mimics normal temperature and humidity conditions should be used.
- Basements and crawl spaces must be dry.
- Crawl space should be a minimum of 18″ (457mm) from ground to underside of joists.
- Crawl space ground should be covered by a vapor retarder of black polyethylene (minimum 6 mil) or any recommended puncture-resistant membrane, such as Class C, meeting ASTM D-1745. The crawl space should have perimeter venting equal to a minimum of 1.5 sq ft per 100 sq ft of crawlspace, unless local building codes differ from this specification.
Note: Follow local building codes. If the crawl spaces lack ventilation openings, vapor retarder joints must overlap a minimum of 6 inches, and be sealed or taped. Vapor retarder should also extend at least 6 inches up the stem wall and be attached and sealed to the stem wall. Continuously operated mechanical exhaust and perimeter wall insulation or conditioned air supply and insulation must be provided.
ACCLIMATION
Acclimation is critical. Before installation, allow floors to acclimate to the appropriate jobsite conditions (depending on geographic location and climate). Per NWFA guidelines, proper acclimation is particularly important in dry climates. Out-of-the-box acclimation is the most effective and recommended. If this is not possible, open boxes and plastic wrapping at both ends to allow air to circulate. Lay flat for a minimum of 3 days, or until proper conditions are met. This should take place after the permanent heating and/or air-conditioning system is operating. Use a moisture meter to monitor moisture content (MC) at the time of delivery and installation. Sample about 40 boards for every 1,000 sq ft of flooring.
PROTECTIVE FLOOR COVERING
After installation, if you choose to protectively cover the floor, do so for the entire floor. Since some species are light-sensitive and uncovered areas may change color. However, covering a glue-down application may not allow some adhesives to properly cure. Follow the adhesive manufacturers’ recommendations. Use a covering material with a vapor permeance (perm rating) of 1 perm or more (tested in accordance with ASTM E-96) to avoid trapping moisture/vapor on or within the floor. A common, reinforced builder’s paper is a good choice. Covering should be taped using a low-adhesion tape, to base or shoe moldings. Avoid taping for finished flooring. When taping paper or sheets together, tape them to each other, not to the floor.
Subfloor
Level drop must be no more than 1/4″ in a 10 feet radius.
WOOD SUBFLOOR
- Subfloor panels must conform to U.S. Voluntary Product Standard PS1-95, Construction & Industrial Plywood, U.S. Voluntary PS 2-04, Canadian performance standard CAN/CSA 0325.0-92 Construction Sheathing. Other CSA standards apply.
- Engineered Flooring should not be installed directly on solid board subflooring.
- Both CDX EXPOSURE 1 plywood and OSB Exposure 1 subfloor panels are appropriate subflooring materials.
- Ensure that moisture content of subfloor/substrate meets industry standard.
- There should be no more than a 4% moisture content difference between Engineered Flooring and subfloor.
- Subfloor must be free from any type of paint, oil, grease, dust, and residues.
- Subfloor should be level. The drop must be no more than 1/4″ in a 10 feet radius.
- For panel products subflooring, check for loose panels. Re-nail or screw down loose panels securely.
- Ensure proper expansion space (1/8″) between panels. If subfloor panels are not tongue-and-grooved and if there is not sufficient expansion space, use a circular saw to create the specified space. Do not saw through joints on T&G subfloors.
- Wood subfloors must be flat, clean, dry, structurally sound, squeak free, and free of protruding fasteners.
- Check and repair delaminated or damaged areas.
- Clear debris.
- Truss/joist spacing will determine the minimum acceptable thickness of panel subflooring. On truss/joist spacing of 16″ (406mm) o/c or less, the industry standard for single-panel subflooring is nominal 5/8″ (19/32″, 15.1mm) CD Exposure 1 Plywood subfloor panels (CD EXPOSURE 1) or 23/32 OSB Exposure 1 subfloor panels, 4′ X 8′ sheets.
On truss/joist spacing of more than 16″, up to 19.2″ (488mm) o/c, the standard is nominal ¾” (23/32″, 18.3mm) T&G CD EXPOSURE 1 Plywood subfloor panels, (Exposure 1), 4′ X 8′ sheets, glued/mechanically fastened, or nominal ¾” (23/32″, 18.3mm) OSB Exposure 1 subfloor panels, 4′ x 8′ sheets, glued/mechanically fastened.
Truss/joist systems spaced over more than 19.2″ (488mm) o/c up to a maximum of 24″ (610mm) require nominal 7/8″ T&G CD EXPOSURE 1 Plywood subfloor panels, (Exposure 1), 4′ X 8′ sheets, glued/ mechanically fastened, or nominal 1″ OSB Exposure 1 subfloor panels, 4′ x 8′ sheets, glued/mechanically fastened—or two layers of subflooring.
VAPOR RETARDERS OVER WOOD SUBFLOORS
There should be no more than 4% moisture content difference between Engineered Flooring and the subfloor. For example, if the flooring has 8% moisture content, the subfloor should not be under 4% or over 12% moisture content. An acceptable vapor retarder is a vapor resistant material, membrane or covering with a vapor permeance (perm rating) of greater than or equal to 0.7 and less than or equal to 50 when tested in accordance with ASTM E-96 Method A. Installation of a vapor retarder reduces potential for moisture/vapor related problems.
CONCRETE SUBFLOOR
Concrete subfloor must be flat. If not, consider grinding/ floating.
Concrete subfloor must be dry. If a slab tests too high in vapor emission to glue a floor down, use a vapor retarder.
Slab must be minimum 3000 psi: Do not attempt to glue a wood floor over a chalky or soft concrete slab. Concrete should be free of non-compatible sealers, waxes, and oil, paint, drywall compound. Check for presence of sealers by applying drops of water to the slab, if the water beads up, there may be sealers or oils.
Lightweight concrete (less than 3000 psi) must be well bonded to subfloor. Check for hollow spots, cracks, and loose areas. If flooring adhesive has a higher shear strength than concrete, use the floated subfloor installation method.
GLUING A SUBFLOOR OVER CONCRETE
Always follow the adhesive manufacturer’s recommendation for proper application, trowel notch, and spread rate. Add a recommended vapor retarder before applying adhesive.
- Use nominal 3/4″ CDX Exposure 1 Plywood subfloor panels, 4’x8′ sheets.
- Cut the plywood panels to 2’x8′ or 4’x4′ sections.
- Score back of panels, 1/2 the thickness on a 12″x12″ grid.
- Apply an approved adhesive.
- Lay sections in a staggered joint pattern in adhesive, with 1/8″ spacing between sheets, and 3/4″ minimum expansion space at walls and all vertical obstructions.
MOISTURE TESTING FOR CONCRETE SLABS
Tests give an “at the time” result for starting a job, not a permanent condition of your substrate.
- Before moisture testing begins, the concrete slab must be a MINIMUM of 60 days old.
- Use moisture meters designed specifically for concrete moisture testing. These electronic tests are useful survey tools to broadly evaluate the relative moisture conditions of a slab and to select locations for quantitative moisture tests.
- Use calcium chloride testing (ASTM F-1869) or calcium carbide (CM) testing (ASTM D-4944-04). Perform three tests for the first 1,000 sq ft and one test for every additional 1,000 sq ft. It should have no more than 3lbs / per 1000 sq. ft. / per 24 hours. Follow the manufacturer’s instructions for properly placing tests onto concrete.
- If it’s over 3lbs / per 1000 sq. ft. / per 24 hours based on the testing results above, a moisture retarder is required. Use a chemical retarder or urethane membrane, as recommended by the adhesive manufacturer.
FLOATED SUBFLOOR
- Always add vapor retarder before applying underlayment.
- Two layers nominal 1/2″ CDX Exposure 1 Plywood subfloor panels, 4′ x 8′ sheets.
- Place the first plywood layer with edges parallel to wall, without fastening. Leave 3/4″ space between wall and plywood.
- Place plywood panels with 1/8″ gaps between sheets.
- Lay the second layer perpendicular or at 45° angle to the first.
- Plywood panels should be placed with 1/8″ gaps between sheets, and a 3/4″ minimum expansion space at all vertical obstructions and wall lines.
- Staple or staple and glue (with urethane or construction adhesive) the second layer to first layer on 12″ interior grid pattern (6″ on the perimeter).
- Be careful not to damage the vapor retarder.
NAIL DOWN SUBFLOOR
- Vapor retarder is recommended for subfloors over concrete.
- Minimum of nominal 3/4″ CDX Exposure 1 Plywood subfloor panels, 4’x8′ sheets.
- Stagger panel joints allowing approximately 1/8″ expansion space around all panels to prevent edge peaking due to compression caused by panel swell.
- Minimum of 3/4″ expansion space at all vertical obstructions.
- Panels should be mechanically fastened. For powder load or pneumatic pressure information, contact the supplier.
- Fasten 2″ from the edge every 6-8″ along the perimeter of the sheet and one fastener or more spaced every 12 inches. (32 shots / each 4′ x 8′ board.)
NOTE: Fasteners may be powder-driven pins, pneumatic driven nails, screws, deformed pins, or other fasteners suitable for concrete application. Check with fastener manufacturer for specification such as length, drill size, and shot load.
Installation
Engineered Flooring can be appropriate for above-grade, on-grade, and below-grade installations. If soil surrounding a structure is 3 inches or more above the floor of any level, consider that level below grade. This includes walk-out basements. In addition, the surrounding soil should be sloped away from the structure. Yard drainage should direct water away from the building.
GLUE DOWN
- A urethane-based adhesive should be used exclusively. Follow manufacturer’s instructions on trowel size, spread rate, and curing time.
- Create a working line parallel to starting wall, in multiples of plank width, to set up the baseline for installation.
- Lay one row of plank along entire length of work line. Add each additional row of flooring. Watch out for pattern repeats. Offset or stagger joints at least 6”. No end piece should be shorter than the floor board width.
- Push or gently tap boards flush to previous row. Tap against the tongue. To prevent damage, avoid tapping the groove. A tapping block is recommended instead of rubber mallet.
- A 1/2″ expansion space should be left around the perimeter.
- Roll the whole floor with a 150 lb. clean roller.
NAIL DOWN (PLYWOOD SUBFLOOR ONLY)
- Use a 6mm-thick plastic sheeting vapor barrier
- Create working line to starting wall, in multiples of plank width.
- Install first row with groove side towards wall, using top nails as needed. The first rows must be straight.
- Use 20 GA with 1 ¼”-1 ½” cleat nails, nailing every 4″ to 6″ along the tongue of each board. Use 16 GA for floors over ½” thick, nailing every 6” to 8”.
- To avoid damage to tongue (over driven), adjust for proper pressure on compressor.
- Add and adjust each row of wood planks. Offset or stagger the end joints at least 6″ to prevent repeating pattern. No end piece should be shorter than floor board width.
- Push or gently tap boards flush to previous row. Tap against the tongue. To prevent damage, avoid tapping the groove. A tapping block is recommended instead of rubber mallet.
- Leave a 1/2″ expansion space around the perimeter.
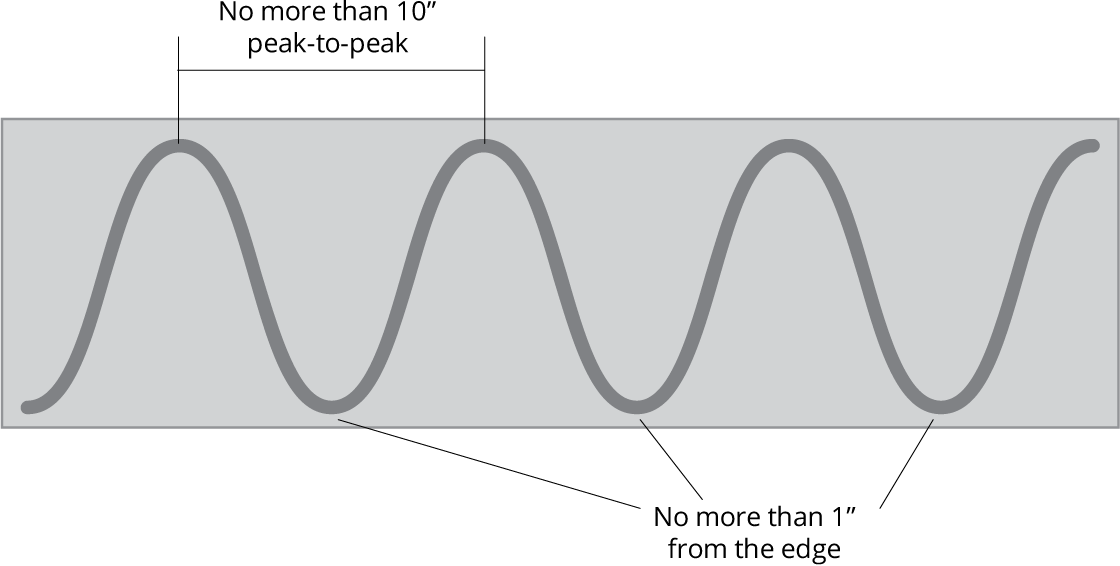
- Supplemental adhesive or full glue installation is required to prevent squeaking, which is caused by unevenness of subfloor or spacing between nailing patterns, especially in flooring that are wider than 5″. On the subfloor or across the width and entire length of the floor board’s back, apply a 3/16″ bead in a “serpentine” pattern. Leave no more than 1″ between the serpentine pattern and edge of floor board. Spacing between “peaks” should not exceed 10″.
RADIANT HEAT INSTALLATION
The following installation and subfloor systems can be used over radiant heat:
- Glue-down, engineered, with approved adhesive
- Glue-down, engineered on double plywood floated subfloor
The maximum allowable subfloor surface temperature is 85° F. Expect some heating season shrinkage. To minimize effect of rapid changes in temperature on moisture content, NWFA recommends an outside thermostat. Unlike conventional heating systems, radiant systems work most effectively and with less trauma to the wood floor if the heating process is gradual—based on small, incremental increases in relation to outside temperature.
Subfloors should be properly tested for moisture in accordance of NWFA guidelines. Essentially, avoid penetration of heating element. Radiant-heated subfloor systems can be concrete, wood, or both. For cured, concrete subfloors, turn the heat on, regardless of season, and leave it on for at least 5 days to remove residual moisture before installation.
Some installation systems, particularly glue-down applications, require heat to be reduced or even turned off before installation of the flooring begins, so adhesive does not cure excessively. With water-heated radiant-heat systems, a pressure test must be performed and documented by a licensed plumber or installer prior to installation. If flooring materials that conduct heat at different rates are on the same circuit or heating zone, consult HVAC mechanical engineer before proceeding.